Working With Primitives
The easiest way to create 3D objects are primitives. Primitives are mathematically defined, parametrical objects like cubes, spheres, pyramids etc.
Primitives in Maya
Creating Primitives
There are 3 ways of creating primitives in Maya:
- The ‘Modeling’ shelf:

- Make sure the ‘Modeling’ shelf is visible. Most icons on this shelf are orange.
- Click one of the primitives on the left part of the shelf.
- The main menu bar:

- In the ‘Modeling’ workspace, go to Create -> Polygon Primitives
- Choose one of the many available polygon primitives. You will find that there are many more Primitives available than there were in the ‘Modeling’ shelf.
- Maya will create the new primitives with default parameters at the world center.
Note
You can enable ‘Interactive Creation’ in this menu to edit the primitves dimesions while creating
- The command line / script editor:

- Open the script editor by clicking the script editor icon in the bottom right corner
- Click the ‘+’ button to add a new script tab.
- In the dialog choose ‘MEL’ to create a mel-script
- Enter
`polyCube -w 2 -h 2;`to create a cube of width (-w) and height (-h) of 2
Hint
You can also run this code by entering it in the commandline:5. Make sure the commandline mode is set to ‘MEL’6. Enter the code in the commandline and press Enter.
Note
Editing Primitives
You can change a primitives parameters in the Attribute Editor or the Channelbox. A primitive in Maya consists of three different nodes ( we will learn about nodes later ). The primitive’s node is always called the same as their command. In case of polygon primitives, find the node prefixed by ‘poly’, for example ‘polyCube1’.
Warning
Maya does not allow to have any nodes with duplicate names in one scene. It will always increase the suffixed number when creating nodes of the same type. If you import or reference a file, you can use namespaces to get around this.
You can now edit a primitives parameters by typing values or by using the sliders. Advanced parameters will only be exposed in the Attribute Editor.

Note
Press ‘T’ after creating a primitive to call up a small floating dialog that lets you edit these parameters without finding the node
As always, you can learn more about primitives, their parameters and usage in the official Autodesk Maya Manual:
Object Manipulation
Selecting Objects
To manipulate objects in the viewport, you must select them first. Switch to the selection tool by pressing Q. You can now marquee-select all objects in the viewport. If you want to remove objects, hold Ctrl while dragging or clicking. Holding shift will toggle the selected objects, deselecting objects that are selected and selecting objects that are unselected.
Hint
If you want to mask certain object types from the selection, you can use the selection mask buttons on top of the shelf:

Note
As always, you can find out a lot more about selecting in the Official Autodesk Maya Documentation
Object manipulation in the viewport
Most object manipulation in maya is done via the three main gizmos: Move, Scale and Rotate. To get rid of a manipulaiton tool, switch to another tool, i.e. selection
| Move | Scale | Rotate | Select |
|---|---|---|---|
 |
 |
 |
 |
| Shortcut: | Shortcut: | Shortcut: | Shortcut: |
| W | E | R | Q |
Note

Working with the manipulation tool and gizmos
You will use the manipulation tools and gizmos in Maya a lot! This section will explain their settings, shortcuts and give you deeper understanding of the tools to make your work easier and faster. Maya uses the middlemouse button heavily: It will let you interact with the tool without clicking an axis or the gizmos center. This manipulation might feel strange at first, but after some time you will be much faster using this mode than precisely clicking the arrows.
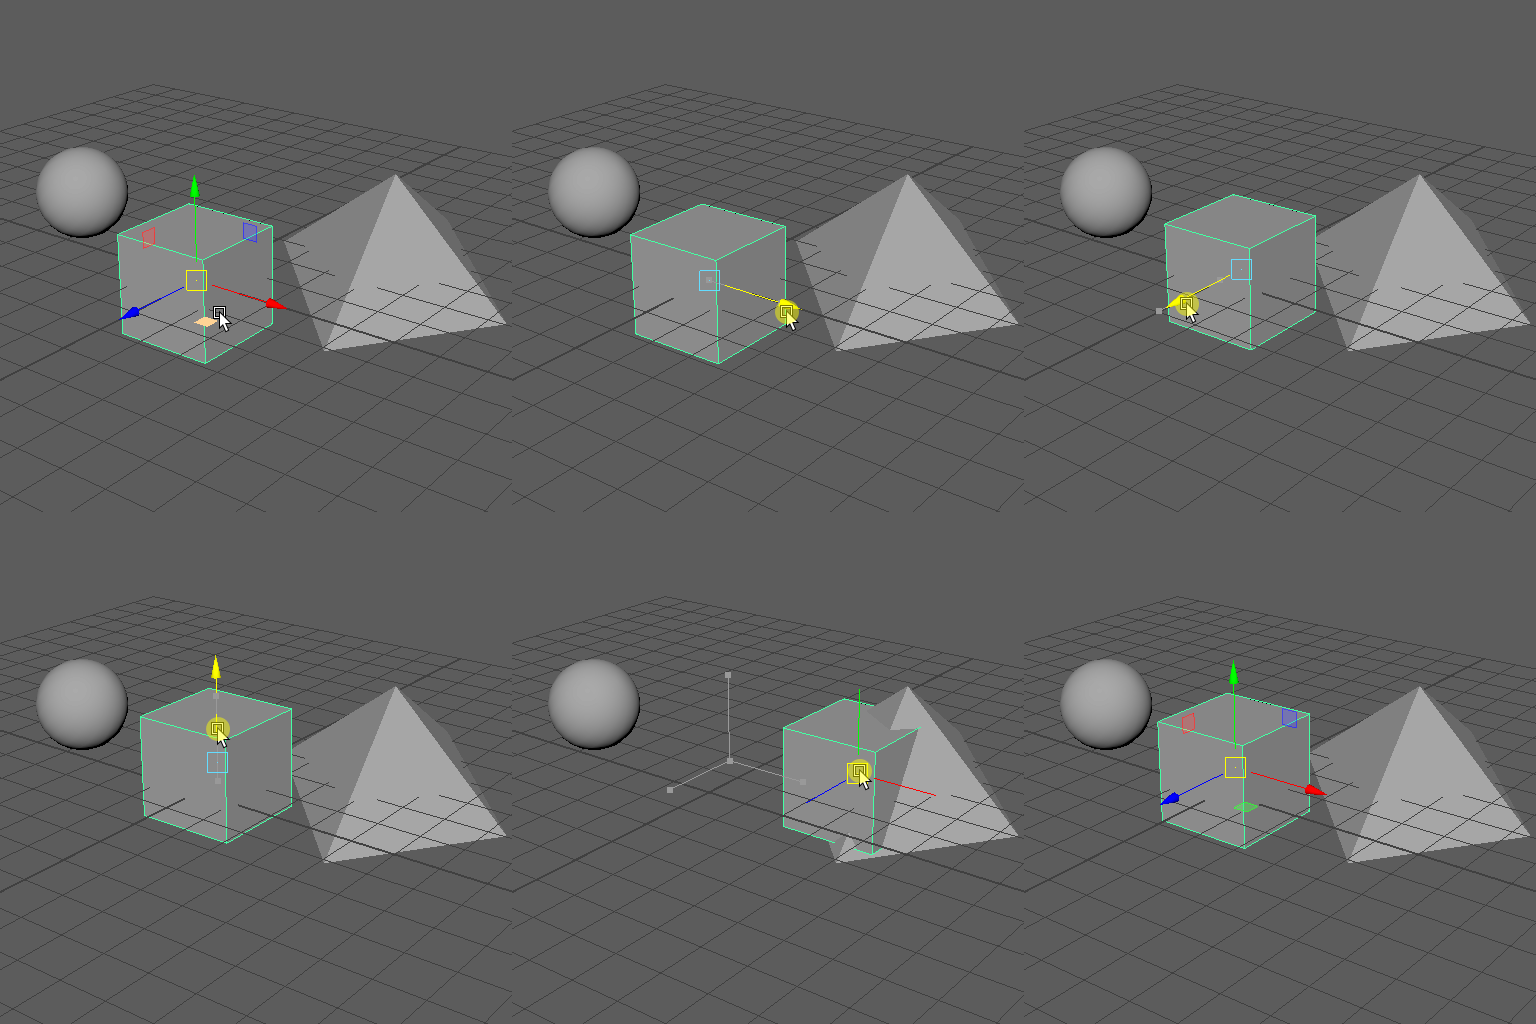
Moving
| Space | Demo | Explanation |
|---|---|---|
| Viewplane |  |
Clicking the middle of the object and dragging will move
the object in the projected 2D view plane. This might sound
mathematical but don’t worry. It just ‘feels’ correct.
Middlemouse-Drag will default to this mode.
|
| Axis Constrain |  |
You can click any axis of the gizmo and drag to move the
object in only this direction. Maya will remember this
direction and show you it is selected by coloring the arrow
yellow.
Middlemouse-Draw now will only move the object in
the selected direction.
|
| Plane Constrain |  |
Clicking any of the rectangles between two arrows will let
you constrain the movement to this axis. You can also
constrain the movement to an axis by ctrl-clicking
the arrow perpendicular to the plane.
Middlemouse-Drag will now be constrained to the last
selected plane.
|
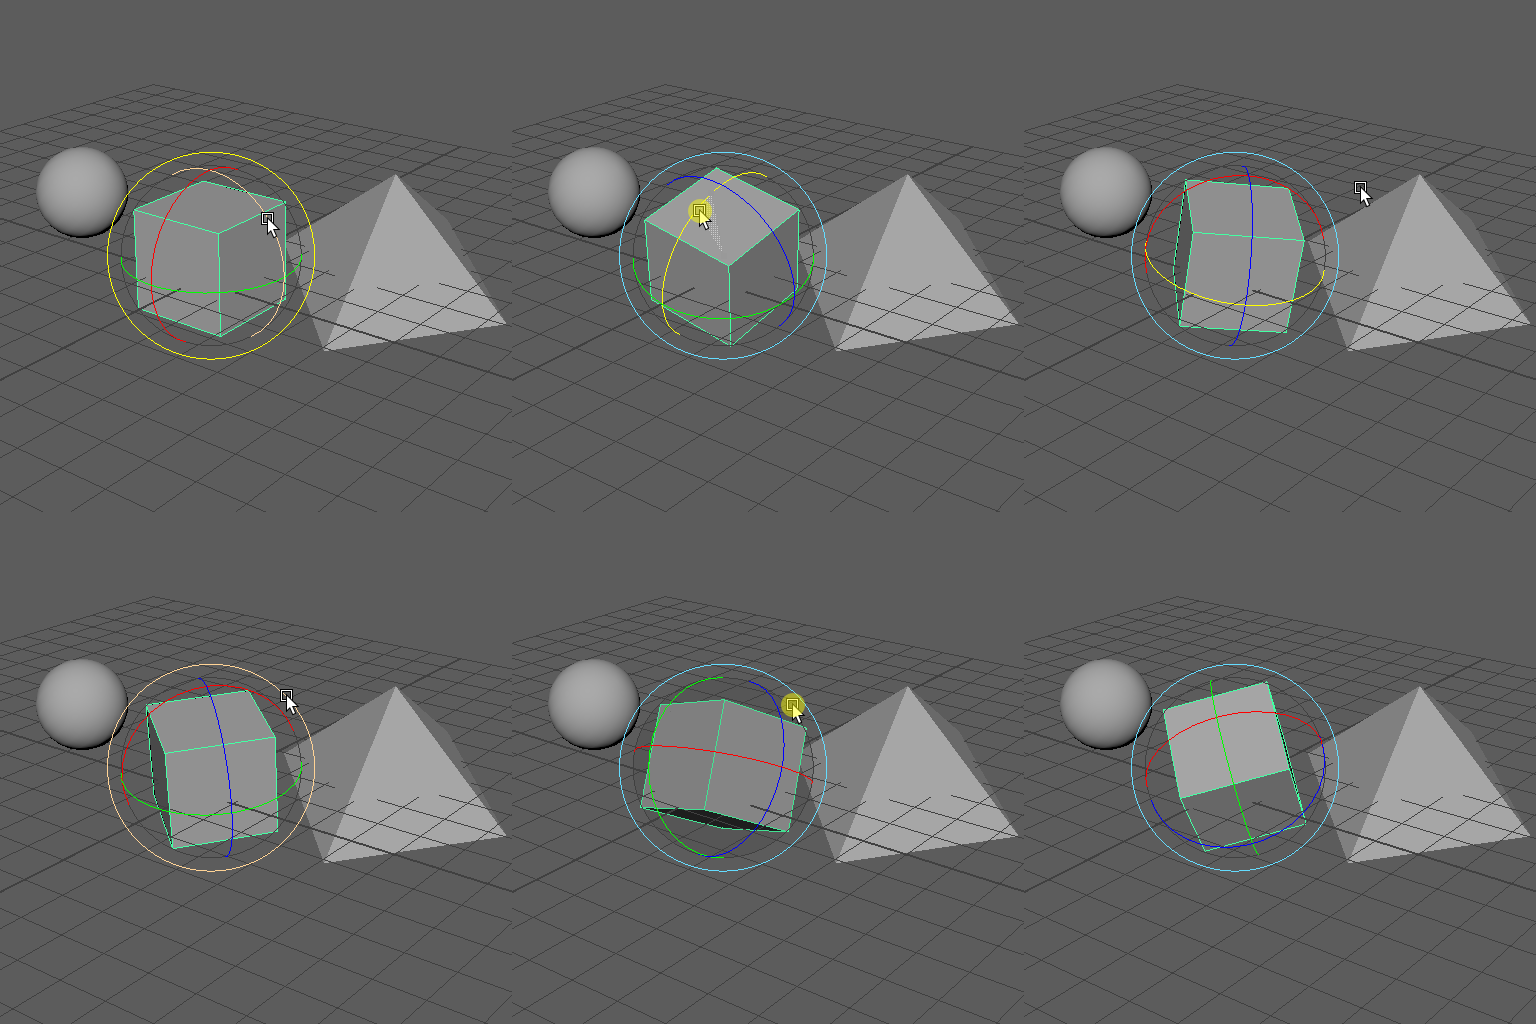
Rotating
| Space | Demo | Explanation |
|---|---|---|
| Trackball |  |
Clicking the grey area of the rotate gizmo will give you a
trackball like rotation. This is the most natural
interaction with the rotate gizmo and will make almost any
rotation possible
|
| Viewplane |  |
Clicking the yellow circle of the gizmo and dragging will
rotate the object around an axis projected straight into
the viewing plane.
Middlemouse-Drag will work like selecting a rotate band.
|
| Axis Constrain |  |
You can click the rotate bands of the gizmo to only rotate
the object around a single axis. Maya will remember this
axis and show you it is selected by coloring the band
yellow.
Middlemouse-Draw now will only rotate the object around
the selected axis.
|
Tip
Scaling
| Space | Demo | Explanation |
|---|---|---|
| Uniform | 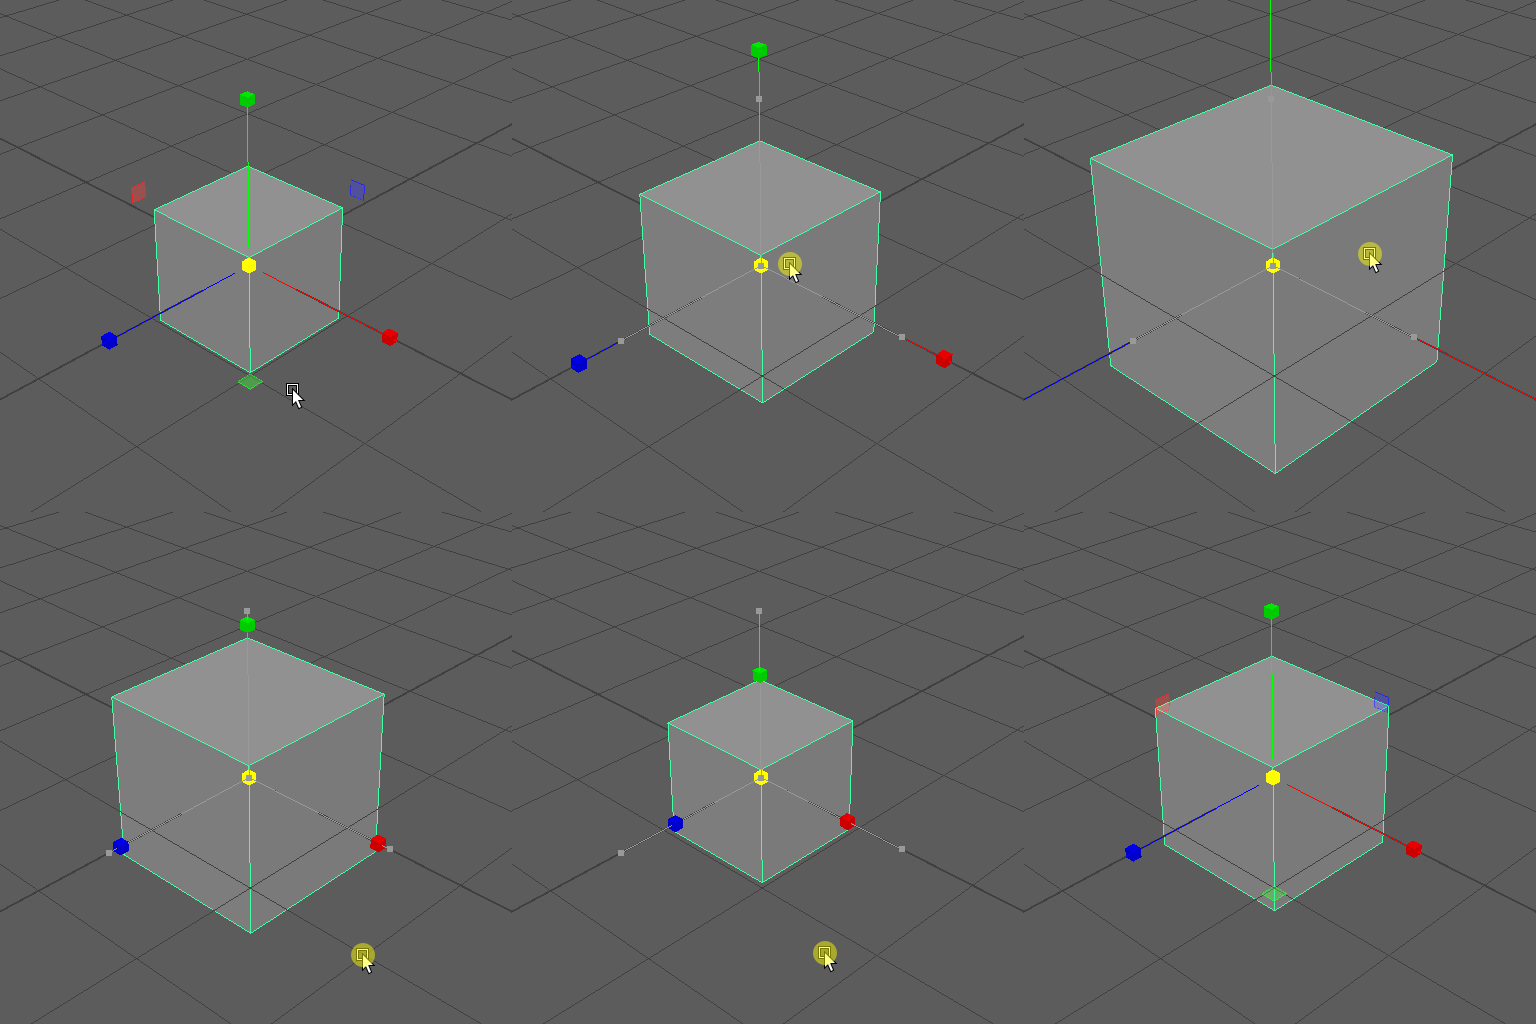 |
Clicking the middle of the gizmo and dragging will scale
the object in the in all three directions at once.
The proportions stay the same and scale uniformly.
Middlemouse-Drag will default to this mode.
|
| Axis Constrain |  |
You can click any axis of the gizmo and drag to scale the
object in only this direction. Maya will remember this
direction and show you it is selected by coloring the box
yellow.
Middlemouse-Draw now will only scale the object in
the selected direction.
|
| Plane Constrain | 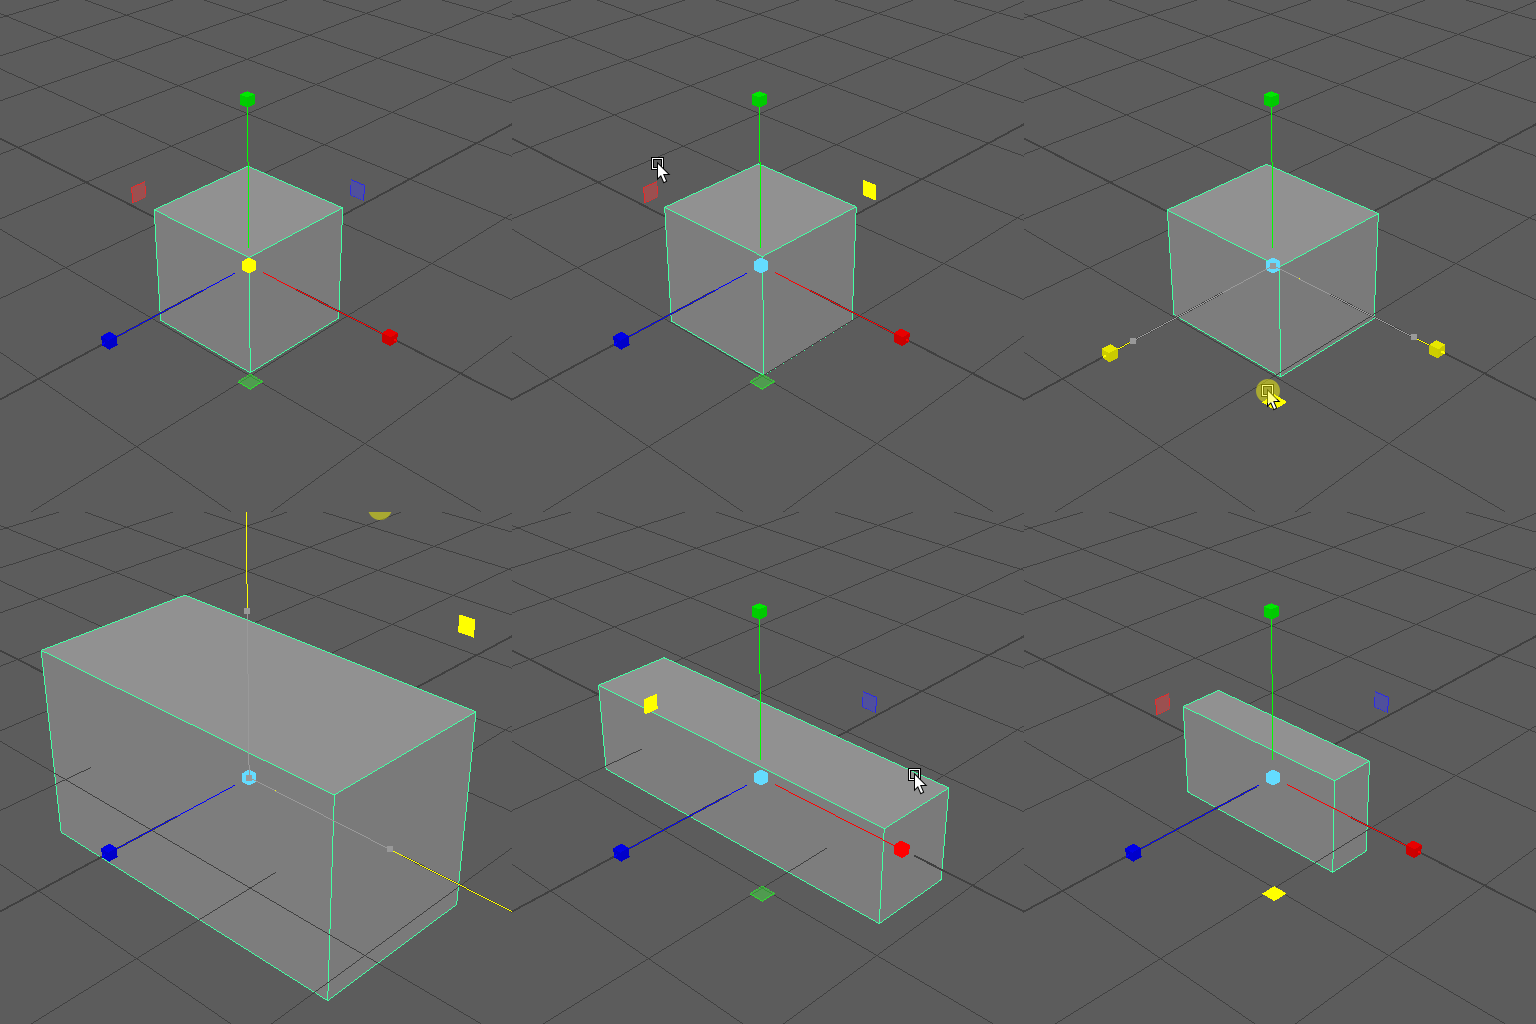 |
Clicking any of the rectangles between two axes will let
you constrain the scaling to this axis. Unlike move,
ctrl-clicking does not work for scaling.
Middlemouse-Drag will now be constrained to the last
selected plane.
|
Warning
This only covers the basic of object transformation without going into details about coordinates, world and local space as well as component transforms. We will dig alot deeper into this topic later in the course. On a personal note: It helps a lot to get used to use the middle mouse button. It will not only make you faster, but it will also be less straining on your wrist, back and arm.
As always, you can find out a lot more about transforming objects in the Official Autodesk Maya Documentation:
Object Pivots
Pivots are the point around which an object gets transformed. Choosing the correct pivot can getting your desired transform easier, faster and more accurate. You can call the pivot tool and move, rotate and orient the temp pivot by pressing ‘D’.
The pivot tool supports all basic transformation tools, including snapping and quantizing.
Find out more about pivots in the official Autodesk Maya Documentation
Object Coordinate Systems
3D objects exist in different coordinate systems called ‘spaces’. Each of these spaces can be used for transformation.
World space, local space and object space
- World Space is the transformation of the object seen from the worlds center. The grid and editor axis show the world space axes.
- Object Space is the transformation of the object seen from the objects point of view. The origin of this space is the object’s pivot point
- Local Space is another object space. Different to an object’s object space, this space is the object space of an objects parent. This is useful if an object is part of a group of objects.
Changing spaces
You can switch an objects space in the Tools Settings. The space is always set per tool, you will have to set it separatly for rotate, move and scale.

A faster way to switch the space is the ‘Settings Hotbox’. You can call this menu by holding Ctrl+Shift+Rightclick and dragging the mouse over one of the leaves.
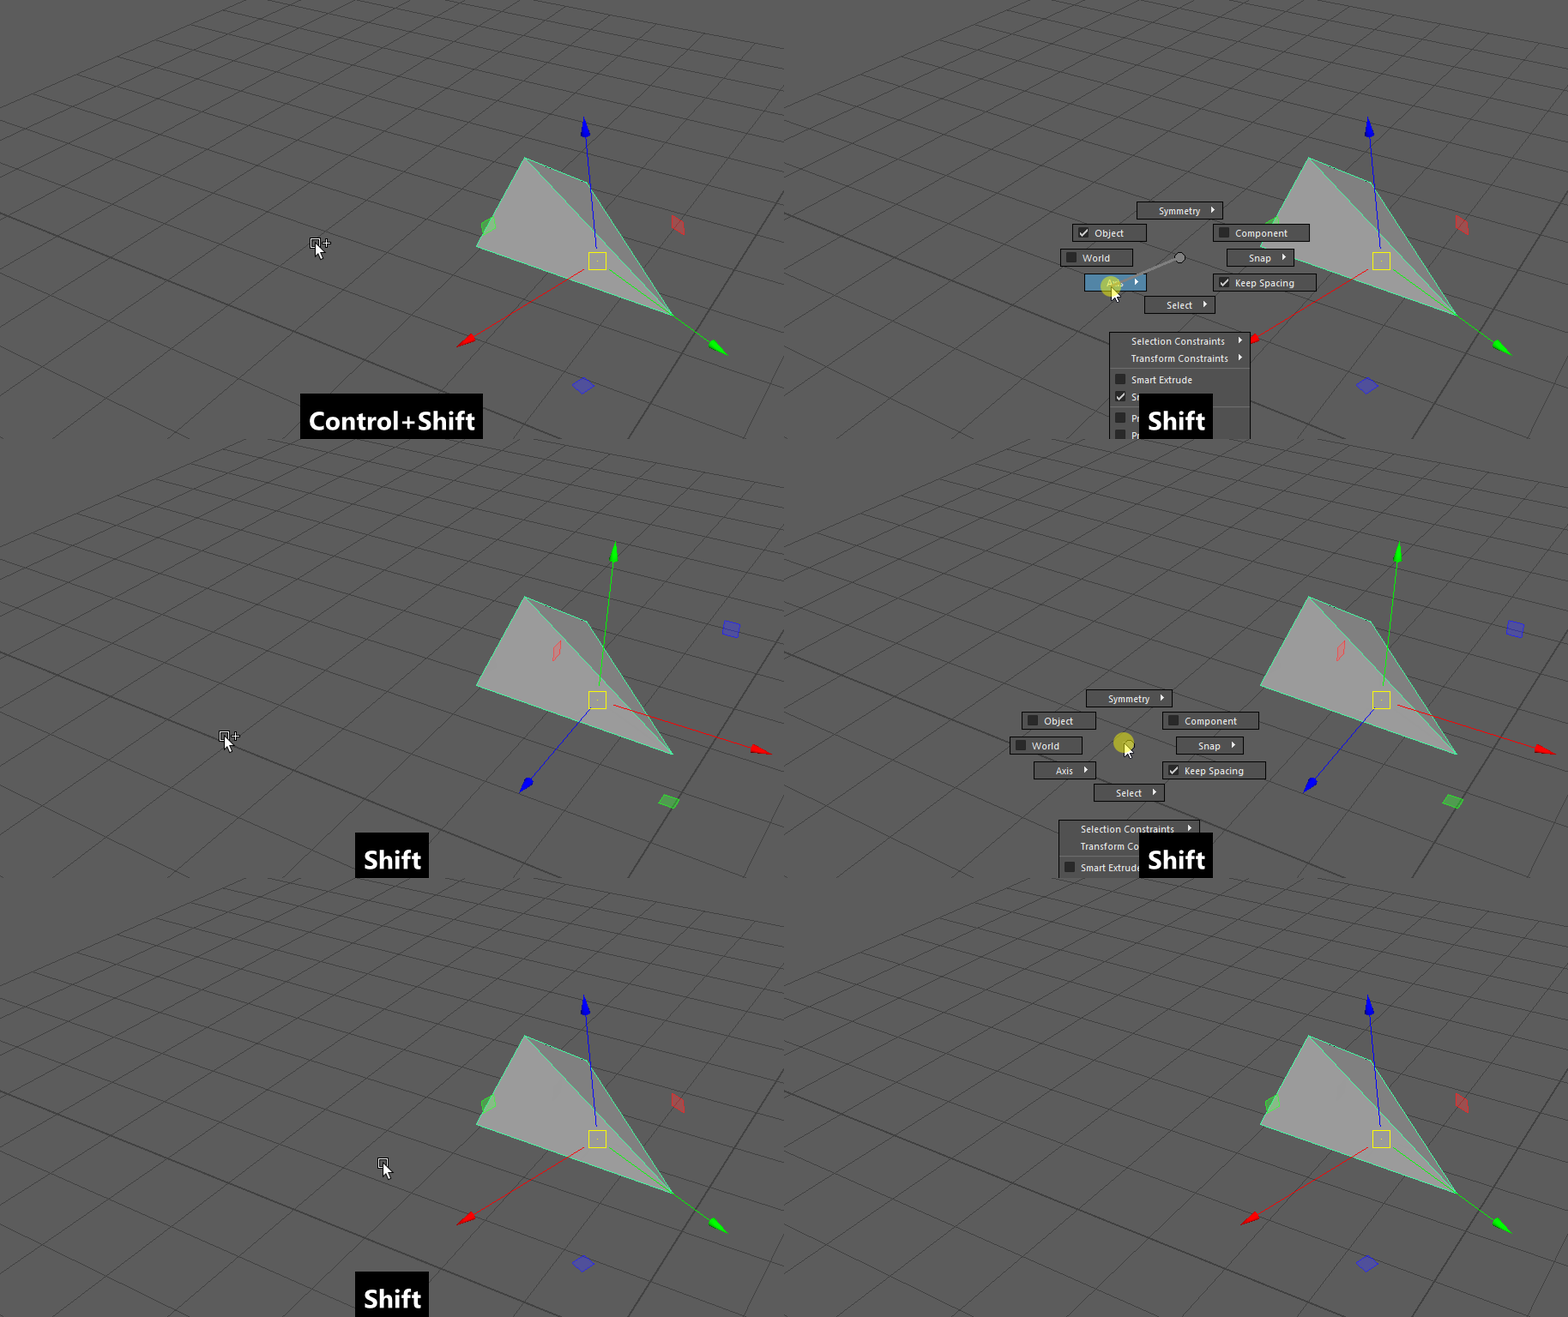
Find out more in the official Autodesk Maya Manual
Snapping
Sometimes, we want to snap an object to a certain point, edge or grid to create precise model. Maya’s snapping tools make this quite easy.
Basic snapping will snap the current translation gizmo to a point, edge or grid intersection. To use snapping, hold down the matching snap hotkey and Middlemouse-Drag over the target component.
| Snaptarget | Shortcut | Example |
|---|---|---|
| Vertex | V |  |
| Edge / Curve | C |  |
| Grid | X |  |
Snapping will remember any axis or plane constraint you set before using it. This way you can align objects only in one axis.
To reset the pivot to its original position, go to the tool settings and press ‘Reset’ .. image:: ./images/reset_pivot.png
As always, you can find a lot more about snapping in the official Autodesk Maya Documentation
Cut, Copy and Paste
Copying and pasting objects is often times faster than creating new ones. To copy and paste in Maya, you can use the hotkeys present in most other software: Ctrl+C to Copy, Ctrl+X to cut and Ctrl+V to paste. Maya will paste a copied object in the same place it was copied or cut from.
A function not available in most other software is ‘Duplicate’. With the hotkey Ctrl+D you can quickly Duplicate an object in place.
Using Shift+D calls the ‘Duplicate With Transform’ command. This command will remember the last transform applied to an object and apply this transform to the duplicated object. With this function you can quickly create an array of the same object with the same distance apart.

Tip
As always, there is a lot more information in the official Maya manual: